Thursday, March 13, 2014

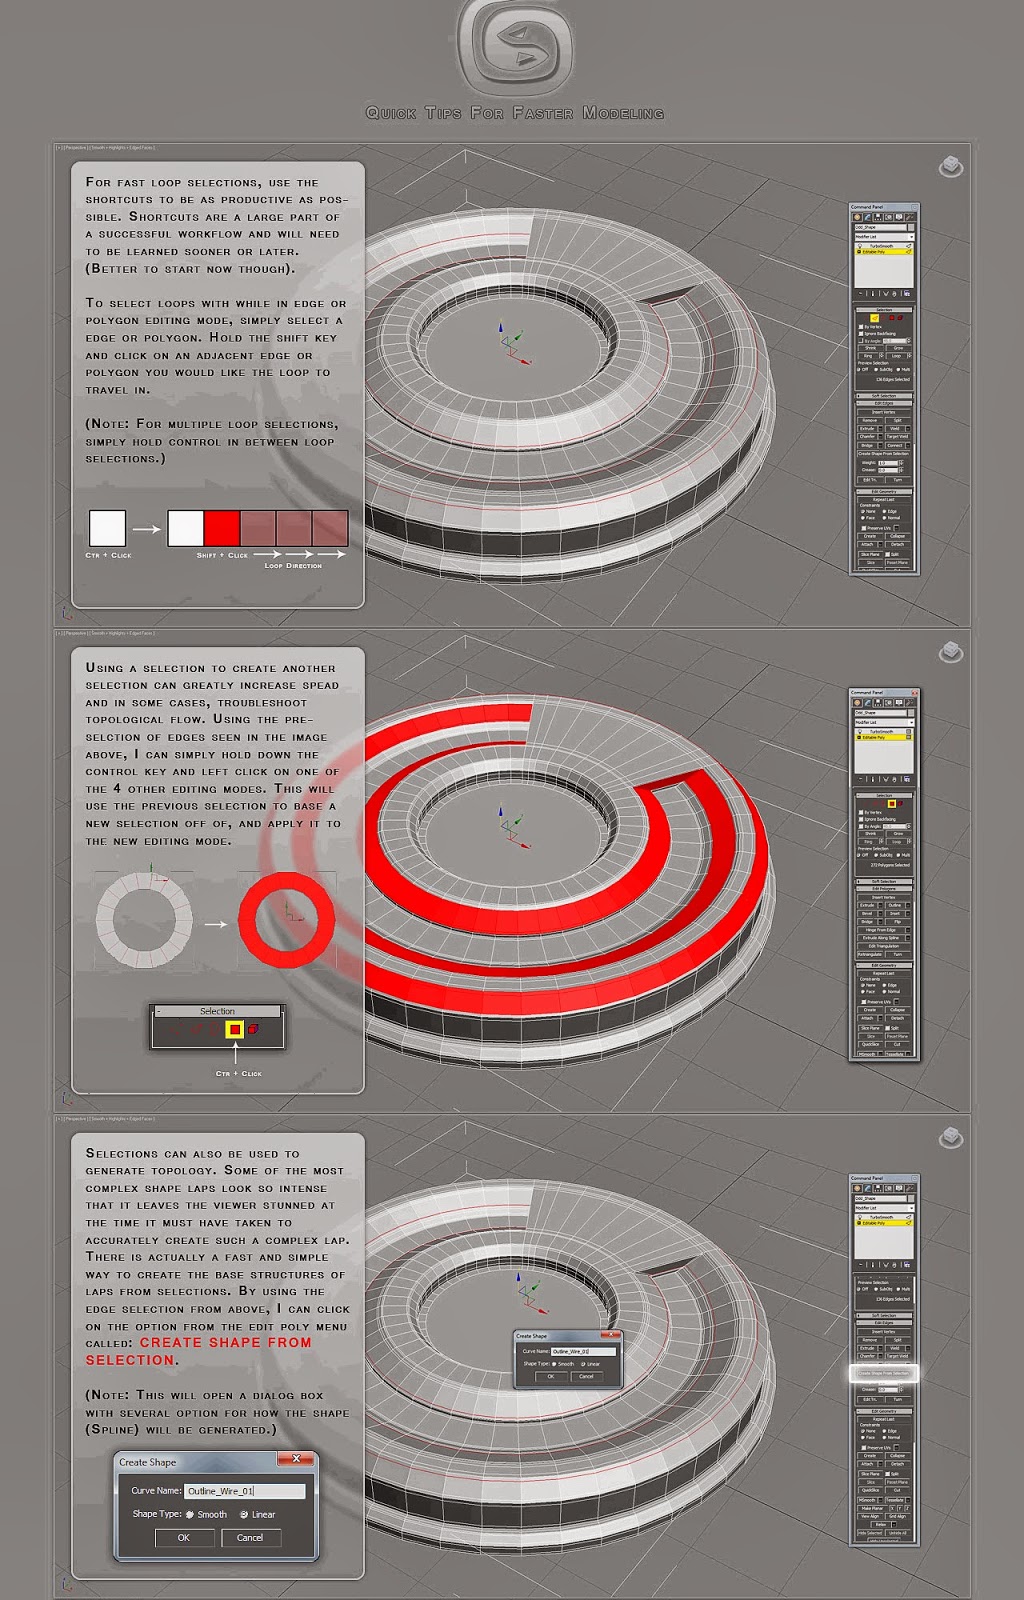
Quick Tips for Faster 3D modeling

A workflow is personalized. While the fundamentals are the same in terms of achieving an end result (Example: High poly model, to Low poly model, to Bake, to Texture), there is no real "Right Way"
My advice on speeding up workflow:
  • Practice and Patience
  • Learning your programs tools and layout
  • Shortcuts (This is a big one)
  • Your ability to recall real world elements for shape creation
You could literally write a never ending book on techniques for speeding up pipelines because it is all unique to the artist.
Try to learn the basic workflow, and begin experimenting and implementing your own methods to suit your needs Smiling
And remember, PRACTICE and PATIENCE is key!
-Jeremy-


Wednesday, February 19, 2014

WIMP

讀了startups界教父輩人物Paul Graham(PG)近來的一篇訪問,最後一條問題,問創業成功,個人要有幾硬淨?PG答:You cannot be a wimp and succeed。
Wimp,說是細膽,不夠準確,說是懦弱,或怯懦比較傳神,不是身體上的弱,是性格上,精神上的弱。
令我想起,幾年前尹思哲寫的書──《創業起義》,其中最後一章是訪問黎智英。在最後一節中,黎智英強調:創業成功,不是看聰不聰明,而是有冇勇氣,wimp永遠不會贏。對,兩者也是用同一個字。
當黎智英和PG不約而同地,都用同一隻字來為關於創業的訪問做結尾,都認為是創業成功最重要的特質,我估,錯極都有個譜。

勇氣與一般蠻勁不同

甚麼是勇氣?勇氣和蠻勁不同,走去笨豬跳,需要的是蠻勁多過勇氣,跳落海創業,大概都靠蠻勁多過勇氣,但有蠻勁創業,不代表有勇氣成功,短線靠蠻勁,長線靠勇氣。創業得夠長時間,總有林林總總意想不到從未遇過的困難不停在你面前出現,有人退縮逃避,蠻勁帶到這裏行人止步。有人敢於面對嘗試克服,那就是勇氣。逃是蠻勁,捱是勇氣。
Wimp最明顯的徵狀,是賴地硬,凡事賴外圍因素,例如startup搞不好,是政府不夠支持,或者最衰是冇個科技局,這是民粹政客思維。政府有冇任何事情可以做來幫你更成功?可能有。政府值得做嗎?未必。但肯定的是,如果認定你最需要的是政府幫手,你公司不會成功。
黎智英和PG,都說勇氣重要。勇氣重要的原因,兩人的看法也很相似。有趣的問題,是勇氣有得後天補足嗎?
PG說,以他投資過百家團隊的經驗,好多人其實有勇氣而不自知,經過試煉,先發掘到出來,當然有人點掘都不會有,但我感覺是他對發掘勇氣,比較樂觀。黎智英則斬釘截鐵:冇得救,wimp是天生的,你天生是就是。
兩者併埋,可以說成:知識可以後補,但勇氣是天生的,有人多、有人少,但就算有,都要經過試煉,先可以發掘出來。有足夠勇氣在創業路上克服一個又一個無盡困難,就是創業成功最重要的特質。
困難是相對你現在的能力。要克服困難,即是要應付超越你現在能力所及的事,一個前提,是你能夠進步,為解決眼前困難而提昇自己的能力。

橫向進步比縱向難得

這幾年來,見過不少人,進步力的差異,大過我想像。進步有兩類,一類,是縱向的進步,同一類事情,由淺入深,一步步晉級。另一類,橫向的進步,是要在不同類型的事情上,水來土掩。我的觀察,是不同的人的橫向進步力差距,比縱向的大得多。創業可能是其中一種最講求橫向進步力的活動,如果觀察屬實,創業的成績差異大,就一點都不出奇。
點解橫向進步力比較難得?我估,是因為橫向進步,需要的勇氣,比縱向多。同一件事,例如專業的職業,由二升到三,由三升到四,已經有個底,繼續前行,未必需要好多勇氣。但如果是面對不同類型的事情,仲要之前連個類型都未見過的,要不斷前行,需要的勇氣多好多。
聽落好似好灰,我自己有兩種想法,去令自己捱的過程好過一點。第一,越困難的事情,克服了,越大滿足感。有個朋友,每年去一次歷險,甚麼環島單車,一支公踩上西藏呀等等,問他點解自找困難,他說因為越難,之後的滿足感越大。第二種想法,是越難的東西,克服了,就越少人能夠趕上,所以遇到困難,尤其是你估對手都會遇到的,應該感恩,如果冇困難,又點會得你一個行到這裏?
讀幾多書,同勇氣有冇關係?自己觀察,關係不大。讀書好,靠聰明勤奮,不太靠勇氣,也不會發掘勇氣。創業如果單靠聰明勤奮,風投基金押注,只看成績表就夠了。如果一個人,頭二十年基本上專注讀書,冇其他比較大的試煉,自己都好難知道有幾多勇氣。
就好似一些電影類型片公式裏頭,主人翁由渾渾噩噩,到無端端開始歷險,一關難過又過一關,最後在心深處發掘出自己的最大勇氣,任務完成,賺到的不只是公主寶劍友誼,還有對自己勇氣的肯定。

宋漢生 

Friday, November 1, 2013

Get a decent 'Nitrous' viewport output with diffuse / normal mapped meshes in 3DS MAX

1. Use BITMAP for material's "Bump" mapping slot instead of "Normal Bump" map type.

2. Use higher resolution (e.g. 2048*2048) PNG bitmap type for baking normal & diffuse light maps.
3. For default scanline render driver, it goes to 3DS mode by default. While for my ATI card only supports 'Nitrous' driver, I get a 'tip' (so generous for Autodesk!!) from official site, I need to use 'Realistic' instead of 'Shaded' mode for viewport rendering to get a decent baked mesh render output.


4. for Normal Map, set 'Blur' to lower value e.g. 0.3 ~ 0.6 and 'Blur offset' to higher, let's say 1.0


Monday, May 27, 2013

Photoshop /3ds Max hot keys & game asset creation practice

0. Ctrl + Right Mouse Click-> create mesh primitives.
1. F12 - translation short cut
2. Freeze a bounding box - create a bounding box for modeling the real mesh which wouldn't be modeled with unexpected portion or form when you extrude some vertices or scale up/down the mesh accidentally.

See through the object.
3. Unfreeze object -> select object -> right click ->object properties -> Display a box
4. Freeze again

Check SNAP Quad setting
5. Shift + Right click -> check
   -> no Grid point
   -> check Vertice
   -> check Snap to Frozen Objects
   -> check "Enable Axis Constraints in Snaps"

6. Snap 2.5D, snap on Z-axis when you are doing in X&Y axes.
??That way, I don't accidentally snap something up onto Z-axis when I only want on X&Y.

7.a A - angle snap for rotation.
7.b S, moving edge/vertex snap to a grid, [Tools->Grid and Snap settings-> option->enable axis constraint]
8. Space bar - selection lock, any modification will lock onto selected object.
9. G - turn on/off the grid

10. UVW unwrapping
      if you find that the connected side for the UVW unwrapped texture is not what you want, just simply flip the object/mesh by rotating the orientation. For example, if you found the top face is not the connected polygon to the sides' faces and it's at the far remote on the unwrapped UVW, just rotate the mesh up side down, it will do you a favor after unwrapping.

11. Alt + x, see through Mode
12. Ctrl+Shift+Z, fit all meshes to screen.
13. Ctrl+Shift+S, Nitrous Texture Tweak
14. set desired current screen, F -> T -> F, set current view as Front view.
15. Ctrl + c, connect segment, after select parallel/multiple segments.
16. Alt + Q, hide un-selected.
17. selected a edge, Alt+L, select the whole loop from that edge.
18. [Ctrl + Shift] Left Click, if you select a vertex/face in a loop, this can select all vertices/faces on a loop.
19. Ctrl + W, Target weld
20. Shift + W, weld
21. Alt + W, Toggle quad view Or specific view with fullscreen
**** 22. Double click on an Edge, select a loop of the edge in a row. !!!important!!!
23a. Select Edge/Vertice, Ctrl + I, invert selection on same mesh
23b. Select Edge/Vertice, Alt + I, hide unselected.
24a. Select Edge / Edge Loop Ring, Shift + E (i.e. extrude perpendicularly) Or
24b. Select Polygon, Right click -> Insect. (i.e. adding scale-down face inward along the same polygon)
25. In UVW unwrap editor,
    a. S - Stitch
    b. D - detach
Note: In 3ds max, select multiple faces, scale on normal axis Or set "Make planar" are the same way to flatten all of the planes.
** move the pivot to center of mesh for alignment to other mesh
*** Ctrl-Shift-x
**** Editable mesh->select face/polygon -> Mouse Right Click-> Select "Inset" properties 
(Note: sometimes we don't want to create edge loop by "shift-f" as it's cannot create the loop around the whole edge of mesh in a time, we need to use "Inset" over on the polygon instread.)

**** Face to Grow: select 1 Face -> click "grow" from the right down menu.

Photoshop Tips for UVW texturing
1. Ctrl + i - invert color (e.g. black background+green lines => white background+pink lines)
2. Ctrl + Shift + u (i.e. saturate to turn to grey lines)
3. Ctrl + L (adjust grey level, usually used in blueprint to highlight those outlines)
3a. Ctrl + +Shift + L (auto-level, bring out the contrast of entire image)
4. double click the background layer name to template -> blending mode to "Multiply" -> lock that layer
5. Z - zoom in/out
6. Ctrl + d - deselect
7. Ctrl (move) + alt (drag & duplicate) / + shift (to lock moving direction)
8. Ctrl + left click on "layer thumbnail" - to select that layer element alone.
9. g - gradient / paint bucket
10.x - toggle color.
11. Ctrl + right click to select layer
12. Ctrl + t - transform (+shift to snap the angle for rotation) + ENTER to finish transform
13. Ctrl + e - flatten / combine / merge layers
14. TAB - maximize working window
15. Space + left click - pan over the layer
16. Ctrl + R - rulers
17. i - ink sample
18. w - magic wand tool
19. m - marquee tool
20. m + select + ARROW keys - nudge or move slightly
21. v - move
22. ctrl + shift + n - new layer
23. e - erase
24. ctrl + -/+ - zoom out/in
25. ctrl + 0 - fit to screen
26. ctrl + g - group
27. t - text input
28. [ or ] - decrease/increase size, for example brush size
29. f - toggle full screen
30. TAB - toggle full screen & toolbars
31. F7 - (in full screen mode)layer menu toggle
32. Ctrl + u - hue/saturation (in any layer)
33. In-Between layers, Alt + Left Mouse Button, making layer Stencil / back layer see thru' upper layer's pattern.
34. Ctrl + J, duplicate layer instantly
35. Ctrl + Shift + u, remove color / desaturate
36. Ctrl + i, color inversion
37. Ctrl + u, hue/saturation/brightness control
38. Ctrl + g, group layers in the layer menu
39. Edit->Define Pattern => Shift + F5 (fill pattern)
40. Ctrl + d, deselection, anything
41. Ctrl + Alt + i, change image size
42. Ctrl + 0, zoom full screen
43. Ctrl + ', turn on Grid = View->Show->Grid

Friday, April 12, 2013

Cautions for importing Blender FBX to Unity3D

I'm using Blender 2.64 for modeling but exporting them to Unity3D 4.x for makgin game.
There are few discrepancies for them.

1. By Default, the scale for FBX imported model is 0.01, weird!
So, you need to create a folder under "Assets\Editor" and place the following script.


  1. using UnityEngine;
  2. using UnityEditor;
  3.  
  4. class MeshPostprocessor : AssetPostprocessor {
  5.  
  6. void OnPreprocessModel () {
  7. (assetImporter as ModelImporter).globalScale = 1; /* whateverNumber */
  8. }
  9.  
  10. }

2. As exporting the model to FBX format, check the "Forward option" as "Z forward", as the setting is "-Z forward" in Blender while in Unity3D is "Z forward".

3. By default, meshes in Blender is 2x2 sized comparing to those in Unity3D, you need to scale down them by 0.5 for all dimemsions (i.e. x:y:z).

4. And texture images files cannot be FBX-exported to Unity3D automatically, you need to use a software called "FBX converter 2013" embedded those image textures into the FBX files before "asset-import" to Unity3D.


Thursday, March 21, 2013

Sincere advice for an Indie game developer

This may be a good recommendation for a game start-up, especially for Indie, even, for ME!


Essential Indie Lessons
Thought: If you think about starting a project as a hobby and don’t want it to last a few years, or if you don’t have somebody to coordinate a bigger team, think twice about adding a 3rd dimension to your game and rather think about a great 2D game concept that can be realized with a small number of people (i.e. typically a programmer and an artist). Of course this insight isn’t true for all projects. If you found a great way of focusing and reducing gameplay, visual style or environment complexity, you might be OK with a small team. Take Rat King Entertainment for example. They’re a team of 2 and make the awesome Tri 2, a 3D platform puzzle game I’m looking forward to seeing released. So a 3D game might work if you have a unique approach to your game and stay focused on your very own niche and limited scope.

http://www.design3.com/component/k2/item/2547-essential-indie-lessons

Wednesday, December 5, 2012

Wine 1.5 : Can't find MFC42.dll issue


Adding the Wine PPA from: http://www.winehq.org/download/ubuntu solved the problem for me.

Sol:#1
sudo add-apt-repository  ppa:ubuntu-wine/ppa
sudo apt-get update & upgrade
winetricks  mfc42 
(FAILED!!) 

Sol:#2
cp MFC42.dll ~/.wine/drive_c/windows/system32
(OK!!)
 
Reference:
- http://support.casahl.com/kb/raknowledgebase.nsf/743c29533b14ab63882564ae007d738a/07d8d84ab1a2c09d8825686c007ab6d1?OpenDocument 
- http://askubuntu.com/questions/169218/winetricks-cant-install-mfc42 

Monday, December 3, 2012

Ubuntu Desktop : get back everything

Few days ago, I've removed KDE System Setting configuration menu accidentally.
But a silver bullet can get back everything

~$ sudo apt-get install ubuntu-desktop

Dada!!


Saturday, November 24, 2012

Setup Subversion in Ubuntu


安裝 Subversion

要善用Ubuntu超級豐富的APT套件庫,不但省時省力、日後也好維護。
sudo apt-get install subversion
一道指令解決。

設定 SVN 伺服器

自己架設伺服器也只需要很少的幾個步驟。
sudo apt-get install xinet.d (EDIT: xinet.d -> xinetd)
這道指令並非與SVN直接相關,而是安裝一個xinetd的daemon程式,它就像一個伺服器服務程式的管家,負責幫忙接待想透過網路連結服務的客戶。

建立新檔案在 /etc/xinet.d/svn ,檔案內容如下:
# default: off
# description: svnserve is the server part of Subversion.
# server_args = -i -r /var/lib/svn/repositories
service svn
{
disable = no
port = 3690
socket_type = stream
protocol = tcp
wait = no
user = svn (EDIT: svn change to your username e.g.: henryY)
server = /usr/bin/svnserve
server_args = -i -r /home/svn
}

* /home/svn 是自行指定的 repository 存放目錄

接著建立 svn 的 user 及 home directory:
sudo mkdir /home/svn
sudo useradd -d /home/svn svn (EDIT:sudo useradd -d /home/svn henryY)
sudo chown svn.svn /home/svn (EDIT: sudo chown svn.henryY /home/svn)

重新啟動 xinetd ,測試SVN服務:
sudo /etc/init.d/xinetd restart
telnet localhost 3690

當telnet程式連線成功,並出現以下訊息,則表示SVN daemon已經啟動成功:
( success ( 1 2 ( ANONYMOUS ) ( edit-pipeline svndiff1 absent-entries ) ) )

建立新的 repository

cd /home/svn
sudo svnadmin create NEW_REPO (EDIT:NEW_REPO->MyTestApp)
sudo chown svn.svn NEW_REPO -R (EDIT:sudo chown svn.henryY MyTestApp)

完成之後,就能已 svn 指令(SVN client)操作。
svn list svn://localhost/NEW_REPO (EDIT: svn list svn://localhost/MyTestApp)
當然,因為都還沒有丟檔案,回傳一定是空的。

如果要操作權限(例如有帳號密碼可讀寫,訪客只能讀不能寫),則需要編輯 NEW_REPO/conf/svnserve.conf,設定以下三行(取消註解):
anon-access = read
auth-access = write
password-db = passwd

並在 NEW_REPO/conf/passwd 下新增帳號及密碼,例如:
[users]
jacky = pwd_is_blank

---= Q&A =---

SVN server在運作一段時間後,可能出現資料庫錯誤的狀況,訊息如下:
Could not open the requested SVN filesystem

此時必須使用 db_recover 指令進行修復,以Ubuntu Linux來說,安裝db4.*-util套件即可取得此程式。

以下示範在 Ubuntu Linux 的流程:

先搜尋有哪些db4.*-util版本可以安裝。
apt-cache search db4.*-util
db4.6-util - Berkeley v4.6 Database Utilities db4.2-util - Berkeley v4.2 Database Utilities db4.3-util - Berkeley v4.3 Database Utilities db4.4-util - Berkeley v4.4 Database Utilities db4.5-util - Berkeley v4.5 Database Utilities
我選擇的是db4.4-util,因此開始apt-get安裝。
apt-get install db4.4-util

安裝完成後,就會多一道 db4.4_recover 指令,切換到 svn repository directory 下執行這道指令即可修復。
更多參考資源在:

Then, if we finished all the steps above, we can "svn import"  the first version of our project repo..

type ==> sudo svn import -m "first revision checkin" /home/henryY/dev/MyNewAppProj svn://localhost/MyTestApp/trunk

There maybe an error:
Can't open file '/home/svn/MyTestApp/db/txn-current-lock': Permission denied
 If you "ls" the ./MyTestApp/db directory,
you'll see::
drwxr-sr-x 6 svn henryY 4096 Nov 25 00:40 db/
Since the "svn"  group haven't got the previlege to "Write", only user/owner (i.e. henryY) have the permission...

So, type =>
sudo chmod g+w /home/svn/MyTestApp/*
and do the command below can solved the problme!
sudo svn import -m "first revision checkin" /home/henryY/dev/MyNewAppProj svn://localhost/MyTestApp/trunk

Then, you can commit the latest changes in the working copy project root :
1.) sudo svn ci -m "Log message for the changes..." + user passwd
2.) svn  update
3.) svn log
We must need to update the svn before it reaches the head revision even you've done the commit action. Then, you can review the your working folder's svn log.

Ref: http://blog.lyhdev.com/2008/07/playing-svn-with-ubuntu.html

Saturday, October 6, 2012

Obstacles for developing mobile racing game with Ogrekit

Seems these months concentrates on playing around with the Ogrekit (Ogre+Bullet+blender), Perfect combination actually!!  Obvious advantages are:

Pros:
1. no need to worry rendering issues since everything take care by OGRE, powerful!
2. no need to take care physics stuffs too, by powerful bullet!
3. tempting 3D scene management tools from Blender side.


Although this dreamteam-like dev environment, but the fatal reason for it won't success is the capatibility to the real Blender, most likely the BGE (blender game engine) won't be supported well. So, the strong side for accessing the BGE, plus Python is completely vanished!!!! You can see the emerging for BGE and tons of millions examples to build games relying on BGE currently on the street.

So..............the point is........1.) we need to breakthrough the bottle neck and need to figuring out what/what's not supported by the blender engine on Gamekit...

Otherwise, we need to move BULLET and OGRE out and use another way round for the Physics and Rendering Engine.

then,......I wonder TORCS!!

 Well, it's not easy to develop 3D scene and car mesh. OH!! May not, we can still use BLENDER to build car, road meshes and import to TORCS.

And we also need to adapt the rendering engine (OpenGL??) on Torcs to OpenGL-ES on Android.....Control from Glut/Freegluts to Android?? Don't konw.


But the point is the flexiblity will be increased for that.

Anyway, this is plan B!

PS: Athough Gamekit is a good game engine, but the documentation is not very well and not very popular for the industry? (I donnu the game industries engine..btw) and just 1 or 2 active developer for that....I still haven't dig deeply into TROCS, but I hope it's better than Gamekit for this situation.

Friday, September 28, 2012

PyGamekit - tricks for compilation

Pygamekit compilation

#first - install pip python
1. sudo apt-get install mercurial python-dev python-pip
2. sudo pip install cython

#second - download pygamekit
1. cd ../gamekit/trunk
2. sudo hg clone https://bitbucket.org/DiThi/pygamekit

#thirdly -  gamekit compilation
1. sudo su
2. cd ../gamekit/trunk/
3. mkdir ../build_android (which will hold all the configuration files for building libogrekit)

However, python-dev is installed but the pygamekit may not set the python include path correctly to your linux box's location, so some more steps here to fix it:
a.) vim ../gamekit/trunk/pygamekit/CMakeList.txt
do the modification below or add some makefile debugging message:
 b.) since the "PYTHON_ANDROID_LIB" path should be added correctly, we can do some tricks inside "./gamekit/trunk/CMakeLists.txt"
vim ../gamekit/trunk/CMakeLists.txt
do the changes below to set the path and subdirs of "pygamekit" correctly

c.) Turn Off "OGREKIT_USE_LUA" inside ./trunk/CMake/ConfigOgreKit.cmake.
      This option will bring out OpenAL related source.
d.) vim ../gamekit/trunk/pygamekit/gamekit.pyx
      comment out #include "sound.pxi"
      This will totally remove all sound package from pygamekit which needs OpenAL from gamekit.

Then, we can go back the normal path:
4. cd ../gamekit/trunk/
5. ./configure-android ../build_android
The output should be like this:
6. then, we can build the ogrekit lib with python extension, should be OK!!
7. cd ../gamekit/build_android/
8. make

Ref:
[1] - http://gamekit.org/forum/viewtopic.php?f=2&t=484 

[Latest Update]!!! 2012-10-04
I would like to suspend this build for the pygamekit as I came across the ./gamekit/pygamekit/CMakeLists.txt required the "PYTHON_ANDROID_LIB" path which seems point to seek libraries "libpython2.7.a" & "libpython2.7.so" that they should be cross-compiled libs from android NDK toolchain - "arm-linux-androideabi-gcc" something like that as I compiled the "pygamekit" inside "build_android" configuring from the "gamekit/configure_android" script........okay, I would stop here and find another way round for doing vehicle demo by blender LUA?? or reference from the Ogrekit appVehicleDemo??

Thursday, July 19, 2012

OgreKit not support viewport orientation in Android

As I've compiled the GameKit Android demo .apk and downloaded to by Android phone, it crashed!! Debugging info shown below:

0688): OGRE EXCEPTION(9:UnimplementedException): Setting Viewport orientation mode is not supported in setOrientationMode at /Users/erikvillegas/Development/Android/gamekit-read-only/Ogre-1.8rc/OgreMain/src/OgreViewport.cpp (line 226)

Then, I open OgreViewport.cpp to take alook:

void Viewport::setOrientationMode(OrientationMode orientationMode, bool setDefault) {
#if OGRE_NO_VIEWPORT_ORIENTATIONMODE != 0
        OGRE_EXCEPT(Exception::ERR_NOT_IMPLEMENTED,
                    "Setting Viewport orientation mode is not supported",
                    __FUNCTION__);
#endif
        mOrientationMode = orientationMode;

        if (setDefault){
            setDefaultOrientationMode(orientationMode);
        }

        if (mCamera){
            mCamera->setOrientationMode(mOrientationMode);
        }

}

Obviously, the compile option "
OGRE_NO_VIEWPORT_ORIENTATIONMODE" is not ZERO. Then, I grep -ir "OGRE_NO_VIEWPORT_ORIENTATIONMODE" * and found that it's value should be assigned from the CMake header configure file inside "./trunk/Ogre-1.8rc/Settings/OgreBuildSettings.h.in" and

#define OGRE_NO_VIEWPORT_ORIENTATIONMODE @OGRE_SET_DISABLE_VIEWPORT_ORIENTATIONMODE@


Then, I grep all the files with defined OGRE_SET_DISABLE_VIEWPORT_ORIENTATIONMODE and set it as ZERO, especially the CMake/configOgreKit.cmake, CMake/configureBuild.cmake, and the most important, ./trunk/Ogre-1.8rc/CMakeLists.txt.


Rebuild the dev. folder by "sudo ./configure_android ../android_lib debug"
Goto ../android_lib/make


..wait for the compilation finished... and the view port orientation mode should be disabled.


Here we go!

Wednesday, July 18, 2012

Ogrekit for Android

I'm fond of 3D games and found an open-sourced game kit called "OgreKit" developed by an volunteer. It makes use of OpenGL ES 2.0 in Android and the popular rendering engine - Ogre 3D, to form a game engine. Ok, let's play around with it.

1. goto http://code.google.com/p/gamekit/source/checkout
2. follow the instruction to download the source code in Terminal of your linux box:

svn checkout http://gamekit.googlecode.com/svn/trunk/ gamekit-read-only

3. going into su: type "sudo su"
4. vim ~/.bashrc
5. add environment variables to the bash shell (.bashrc)

PATH="/home/henryl/android-sdks/tools:/home/henryl/android-sdks/platform-tools:/home/henryl/android-ndk-r8:${PATH}"
export PATH

NDK="/home/henryl/android-ndk-r8"
export NDK

NDK_BIN="${NDK}/toolchains/arm-linux-androideabi-4.4.3/prebuilt/linux-x86/bin"  
export NDK_BIN
6. restart Terminal and type "sudo su"
7. go into the "./gamekit-read-only/trunk" and type:
"./configure-android ../build_android" <- you use mkdir ../build_android first
8. cd ../build_android && make
9. after the lengthy compilation, the baked "libogrekit.so" will be placed inside "./build_android/Samples/AndroidDemo/Shared"

Then, we can build an Android apps for using this JNI library.
1. copy libogrekit.so to ./trunk/Samples/AndroidDemo/Demo/libs
2. Goto Eclipse -> New -> Android application from existing code ->
browser to "./trunk/Samples/AndroidDemo/Demo" and finished.
3. copy the asset folder's "asset/gk_android.blend" to /sdcard/gamekit/gk_android.blend.
4. build, download to device and RUN...Here we go!!

references:
http://gamekit.org/forum/viewtopic.php?t=29
http://code.google.com/p/gamekit/

Updated 20120929::
A.)while checkout latest gamekit via
- svn checkout http://gamekit.googlecode.com/svn/trunk/ gamekit-read-only, the "trunk" folder have been removed by designer. And as you run "cmake-gui" by root user (i.e. sudo su) and configure the makefile, you can't setup the android NDK path any more. So, env. variable "OPENGLES2_INCLUDE_DIR" cannot be generated from the cmake tool....so, the workaround is by adding a line 
>>> "set(OPENGLES2_INCLUDE_DIR /home/henryl/android-ndk-r8/platforms/android-9/arch-arm/usr/include)
" inside ./gamekit_root/CMakeLists.txt to do so.


B.) And one more thing, is that while exec. ./configure-android ../build_android, an error 
missing "ANDROID_NDK" env. variable, so, we need to .... 
>>> vim ~/.bashrc
>>> add a line at the end
ANDROID_NDK="/home/henryl/android-ndk-r8"
export ANDROID_NDK


Saturday, June 9, 2012

Cscope 2 - JAVA

http://cscope.sourceforge.net/cscope_vim_tutorial.html
Cscope is a very handy tool, but it's even better when you don't ever have to leave the comfort of your favorite editor (i.e. Vim) to use it. Fortunately, Cscope support has been built into Vim.
This tutorial introduces you both to Vim's built-in Cscope support, and to a set of maps that make searching more convenient.
It is assumed you know the basics of using a vi-style editor, but you don't need any particular knowledge about Vim (where Vim-specific features--like multiple windows--are used, a working knowledge of the features is briefly introduced). You also don't need to know anything about Cscope: the basics are introduced as we go along.
In a nutshell, Vim's Cscope support is very similar to Vim's ctags features, in case you've used those. But since Cscope has more search types than ctags, there are a few differences.
This is a hands-on tutorial, so open up a shell, and follow these steps:
  1. Get and install Cscope if you don't have it already on your machine. Ideally, you will also have Vim 6.x, but you can get most of the functionality with later versions of Vim 5 (vertical splits don't work, but horizontal splits will work if you modify the maps as described in the file's comments). Note: If your version of Vim wasn't compiled with '--enable-cscope', you will need to reconfigure and recompile Vim with that flag. Most Vim binaries that ship with Linux distributions have the Cscope plugin enabled.
  2. Download the cscope_maps.vim file, and arrange for it to be read by Vim at startup time. If you are using Vim 6.x, stick the file in your $HOME/.vim/plugin directory (or in any other 'plugin' subdirectory in your 'runtimepath'). If you are using Vim 5.x, you can either cut and paste the entire contents of the cscope_maps file into your $HOME/.vimrc file, or stick a "source cscope_maps.vim" line into your .vimrc file.
  3. Go into a directory with some C code in it, and enter 'cscope -R' (the '-R' makes Cscope parse all subdirectories, not just the current directory). Since we aren't passing the '-b' flag (which tells Cscope to just build the database, then exit), you will also find yourself inside Cscope's curses-based GUI. Try a couple of searches (hint: you use the arrow keys to move around between search types, and 'tab' to switch between the search types and your search results). Hit the number at the far left of a search result, and Cscope will open Vim right to that location. (unless you've set your EDITOR environment variable to something besides Vim). Exit Vim, and you'll be right back in the Cscope GUI where you left off. Nifty. Alas, the Cscope interface has one big problem: you need to exit Vim each time you want to do a new search. That's where the Vim plugin comes in. Hit CTRL-D to exit Cscope.
  4. Start up Vim. If you want, you can start it with a C symbol (ex: 'vim -t main'), and you should hop right to the definition of that symbol in your code.
  5. Put the cursor over a C symbol that is used in several places in your program. Type "CTRL-\ s" (Control-backslash, then just 's') in quick succession, and you should see a menu at the bottom of your Vim window showing you all the uses of the symbol in the program. Select one of them and hit enter, and you'll jump to that use. As with ctags, you can hit "CTRL-t" to jump back to your original location before the search (and you can nest searches and CTRL-t will unwind them one at a time). Mnemonic: the '\' key is right next to the ']' key, which is used for ctags searches.
  6. Try the same search, but this time via "CTRL-spacebar s". This time, your Vim window will split in two horizontally , and the Cscope search result will be put in the new window. [if you've never used multiple Vim windows before: move between windows via 'CTRL-W w' (or CTRL-W arrow key, or CTRL-W h/j/k/l for left/up/down/right), close a window via 'CTRL-W c' (or good old ':q'), make the current window the only one via 'CTRL-W o', split a window into two via 'CTRL-W s' (or 'CTRL-W v' for a vertical split), open a file in a new window via ':spl[it] filename'] Mnemonic: there's now a big, spacebar-like bar across the middle of your screen separating your Vim windows.
  7. Now try the same search via "CTRL-spacebar CTRL-spacebar s" (just hold down the CTRL key and tap the spacebar twice). If you have trouble hitting the keys fast enough for this to work, go into the cscope_maps.vim script and change Vim's timeout settings as described in the comments [actually, I generally recommend that you turn off Vim's timeouts]. This time your Vim window will be split vertically (note: this doesn't work with Vim 5.x, as vertical splits are new with Vim 6.0).
  8. Up to now we've only been using the keystroke maps from 'cscope_maps.vim', which all do a search for the term that happens to be under your cursor in Vim. To do Cscope searches the old-fashioned way (using Vim's built-in Cscope support), enter ":cscope find symbol foo" (or, more tersely, ":cs f s foo"). To do the horizontal split version, use ":scscope" (or just ":scs") instead (Vim 6.x only). While it's easier to use the maps if the word you want to search for is under your cursor, the command line interface lets you go to any symbol you type in, so you'll definitely want to use it at times.
  9. So far we've only been doing one kind of search: 's', for 'find all uses of symbol X'. Try doing one of Cscope's other searches by using a different letter: 'g' finds the global definition(s) of a symbol, 'c' finds all calls to a function, 'f' opens the filename under the cursor (note: since Cscope by default parses all C header files it finds in /usr/include, you can open up most standard include files with this). Those are the ones I use most frequently, but there are others (look in the cscope_maps.vim file for all of them, and/or read the Cscope man page).
  10. Although Cscope was originally intended only for use with C code, it's actually a very flexible tool that works well with languages like C++ and Java. You can think of it as a generic 'grep' database, with the ability to recognize certain additional constructs like function calls and variable definitions. By default Cscope only parses C, lex, and yacc files (.c, .h, .l, .y) in the current directory (and subdirectories, if you pass the -R flag), and there's currently no way to change that list of file extensions (yes, we ought to change that). So instead you have to make a list of the files that you want to parse, and call it 'cscope.files' (you can call it anything you want if you invoke 'cscope -i foofile'). An easy (and very flexible) way to do this is via the trusty Unix 'find' command:
        find . -name '*.java' > cscope.files
    
    Now run 'cscope -b' to rebuild the database (the -b just builds the database without launching the Cscope GUI), and you'll be able to browse all the symbols in your Java files. Apparently there are folks out there using Cscope to browse and edit large volumes of documentation files, which shows how flexible Cscope's parser is. For larger projects, you may additionally need to use the -q flag, and/or use a more sophisticated 'find' command. See our tutorial on using Cscope with large projects for more info.
  11. Try setting the $CSCOPE_DB environment variable to point to a Cscope database you create, so you won't always need to launch Vim in the same directory as the database. This is particularly useful for projects where code is split into multiple subdirectories. Note: for this to work, you should build the database with absolute pathnames: cd to /, and do
        find /my/project/dir -name '*.c' -o -name '*.h' > /foo/cscope.files
    
    Then run Cscope in the same directory as the cscope.files file (or use 'cscope -i /foo/cscope.files'), then set and export the $CSCOPE_DB variable, pointing it to the cscope.out file that results):
        cd /foo
        cscope -b
        CSCOPE_DB=/foo/cscope.out; export CSCOPE_DB   
    
    (The last command above is for Bourne/Korn/Bash shells: I've forgotten how to export variables in csh-based shells, since I avoid them like the plague). You should now be able to run 'vim -t foo' in any directory on your machine and have Vim jump right to the definition of 'foo'. I tend to write little shell scripts (that just define and export CSCOPE_DB) for all my different projects, which lets me switch between them with a simple 'source projectA' command.
    BUG: in versions of Cscope prior to 15.4, there is a silly bug that may cause Vim to freeze when you do this unless you call your database something other than the default 'cscope.out': use '-f foo' in your Cscope invocation to name your database 'foo.out' instead, and you'll be OK.
  12. That's it! Use ":help cscope" (in Vim) and/or "man cscope" (from your shell) if you've got questions, and to learn the fine points.

Csope

Just find a useful resource on using Cscope. Here we go!

我的平台:Linux SUSE 10.1 硬件平台普通
1, cscope安装

  1. 软件下载:http://sourceforge.net/project/showfiles.php?group_id=4664
  2. 软件安装: 
    1. ./configure --with-flex  (注:如果平台是Linux,最好带上 --with-flex选项)
    2. make  (注:我没有遇到错误)
    3. make install (注: 直接安装好了)
2,cscope配置
  1. 修改vim配置文件vimrc.你可以修改/etc/vimrc使用所有用户都使用本配置文件,当然你还可以修改~/.vimrc
    1. 下载配置文件:cscope_map.vim  
    2. 把cscope_map.vim里从 if has("cscope")  到 endif里边的内容复制到/etc/vimrc里边去
    3. 里边的命令意思请看下边文章
3,cscope使用
  1. 建立cscope使用的索引文件
    1. 在你需要浏览源码的根目录下(如你想用cscope看linux源码)使用下面命令:
      • #: cscope -Rbkq<回车>
    2. R 表示把所有子目录里的文件也建立索引
    3. b 表示cscope不启动自带的用户界面,而仅仅建立符号数据库
    4. q生成cscope.in.out和cscope.po.out文件,加快cscope的索引速度
    5. k在生成索引文件时,不搜索/usr/include目录
  2. 在源码根目录下打开任意.c文件,使用如下命令:
    1. Ctrl+]将跳到光标所在变量或函数的定义处 Ctrl+T返回
    2. :cs find s ---- 查找C语言符号,即查找函数名、宏、枚举值等出现的地方
      :cs find g ---- 查找函数、宏、枚举等定义的位置,类似ctags所提供的功能
      :cs find d ---- 查找本函数调用的函数
      :cs find c ---- 查找调用本函数的函数
      :cs find t: ---- 查找指定的字符串
      :cs find e ---- 查找egrep模式,相当于egrep功能,但查找速度快多了
      :cs find f ---- 查找并打开文件,类似vim的find功能
      :cs find i ---- 查找包含本文件的文
    3. 2的所以命令也可以且按銉来实现:
      1. Ctrl+/ 再按 s 表示:cs find s命令
      2. 同理实现cs find + g,d,c,t,e,f,i命令
  3. cscope_map.vim说明:
    1. 有英文注释的我就不说明了,我就说一下里边的键map映射
    2. 如: nmap <C-/>s :cs find s <C-R>=expand("<cword>")<CR><CR>
      1. nmap 表示在vim的普通模式下,即相对于:编辑模块和可视模式,以下是几种模式
        1.         :map            普通,可视模式及操作符等待模式
                  :vmap           可视模式
                  :omap           操作符等待模式
                  :map!           插入和命令行模式
                  :imap           插入模式
                  :cmap           命令行模式
      2. <C-/>表示:Ctrl+/
      3. s表示输入(即按:s)s
      4. : 表示输入':'
      5. “cs find s"表示输入"cs find s"也即是要输入的命令
      6. <C-R>=expand("cword")总体是为了得到:光标下的变量或函数。cword 表示:cursor word, 类似的还有:cfile表示光标所在处的文件名吧
      7. <CR><CR>就是回车吧,不太清楚
  4. 其它的特补充吧。。今天就写到这里。

Friday, June 8, 2012

How to use Ctags for JAVA?

very simple, just type in following command under the source root path in linux terminal:
> ctags-exuberant -R --language-force=java

BINGO!

Monday, May 28, 2012

Setup Android Debug Bridge with real Android Device


In first step, we need to enable Android device to debug mode:
Setting->Application->Development->USB debug (check it)

Next step is to add device to "adb"  list, following below:
  1. Log in as root and create this file: /etc/udev/rules.d/51-android.rules. Use this format to add each vendor to the file:
    SUBSYSTEM=="usb", ATTR{idVendor}=="0bb4", MODE="0666", GROUP="plugdev"

    In this example, the vendor ID is for HTC. The MODE assignment specifies read/write permissions, and GROUP defines which Unix group owns the device node.
    Note: The rule syntax may vary slightly depending on your environment. Consult the udev documentation for your system as needed. For an overview of rule syntax, see this guide to writing udev rules.
  2. Now execute:
    chmod a+r /etc/udev/rules.d/51-android.rules 
Please refer to android dev. site for more details.

Thirdly, in any head portion of your andoird Java source, placing

import android.util.Log;

Then, in the beginning of any class you would like to debug, add a "TAG" which is a string MACRO using for declaring the type of debugging message.

public class TouchHandler implements ITouchhandler
{
    ...
    private static final String TAG = "Touch Info";
    ...
    ...
    ... 
}

Ok, in any target code, you can add something like:

Log.d(TAG, "PointerCount="+event.getPointerCount());

There are different classees of debugging message which android platform provided.
you can refer to this link:
http://developer.android.com/guide/developing/debugging/debugging-log.html

Finally, it the most important step is to open the "adb Locat" application for realtime debugging with "real" android device.

Goto android sdk path:

~/android-sdks/platform-tools/sudo ./adb logcat

Here we go!!

You can see the screen capture shown above, the touch pointer location and the detected touch pointer counts are display synchronously with your action on the real device.