Thursday, March 13, 2014

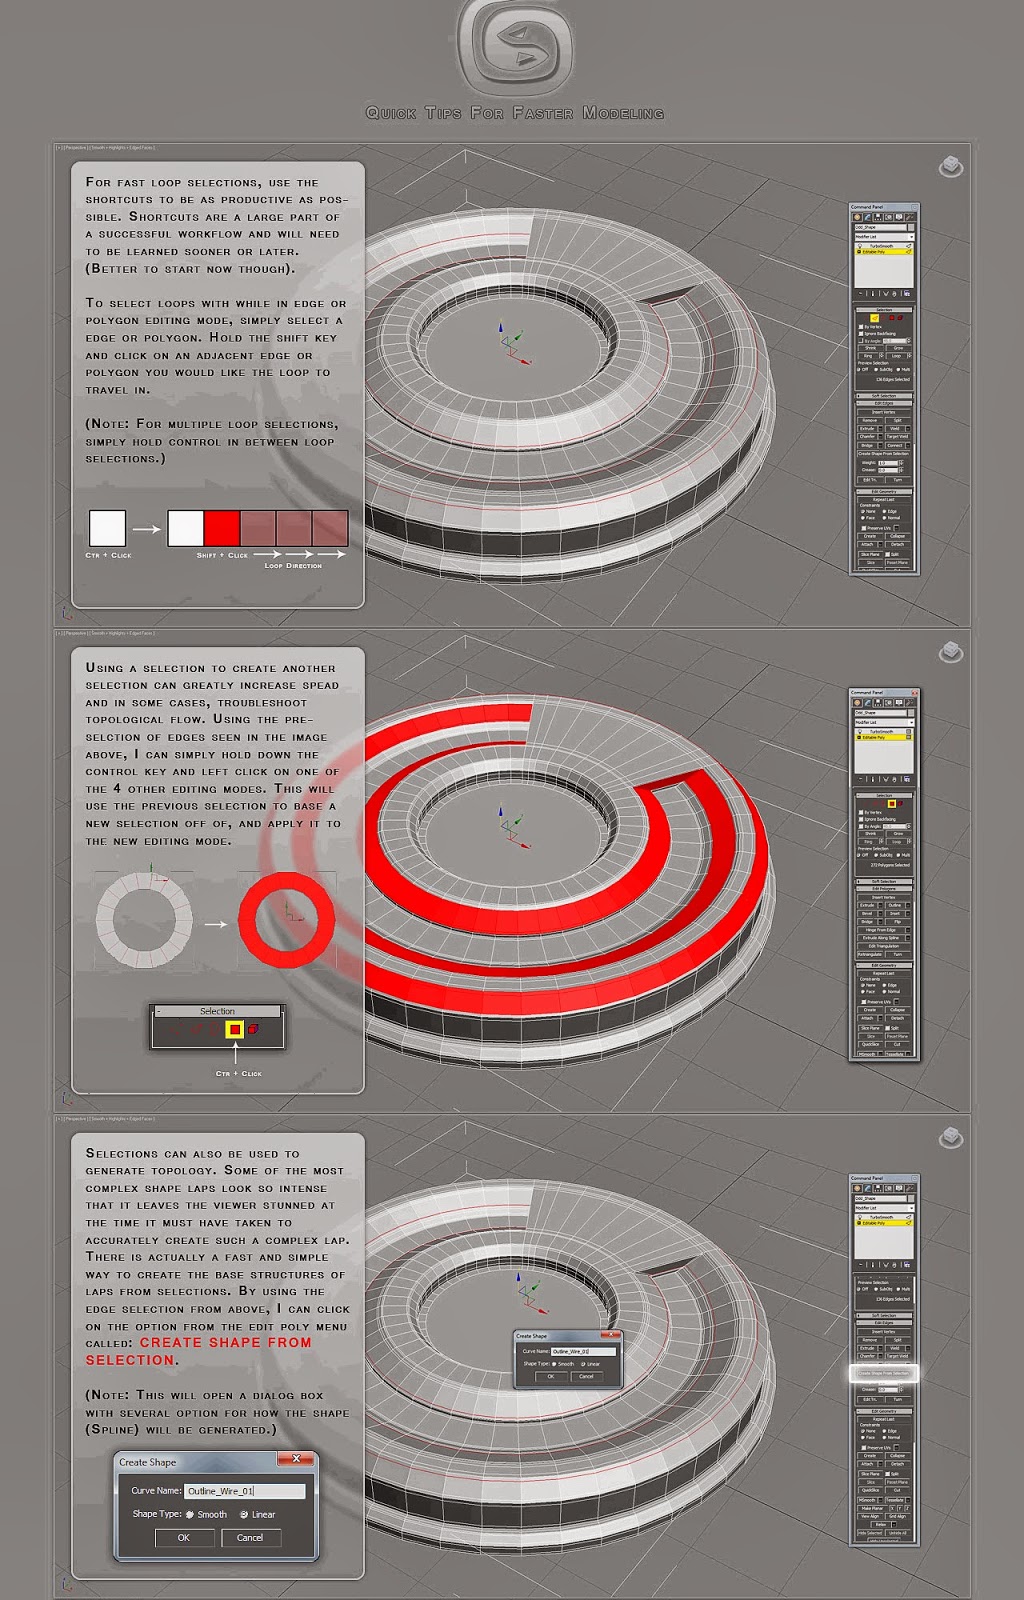
Quick Tips for Faster 3D modeling

A workflow is personalized. While the fundamentals are the same in terms of achieving an end result (Example: High poly model, to Low poly model, to Bake, to Texture), there is no real "Right Way"
My advice on speeding up workflow:
  • Practice and Patience
  • Learning your programs tools and layout
  • Shortcuts (This is a big one)
  • Your ability to recall real world elements for shape creation
You could literally write a never ending book on techniques for speeding up pipelines because it is all unique to the artist.
Try to learn the basic workflow, and begin experimenting and implementing your own methods to suit your needs Smiling
And remember, PRACTICE and PATIENCE is key!
-Jeremy-


Wednesday, February 19, 2014

WIMP

讀了startups界教父輩人物Paul Graham(PG)近來的一篇訪問,最後一條問題,問創業成功,個人要有幾硬淨?PG答:You cannot be a wimp and succeed。
Wimp,說是細膽,不夠準確,說是懦弱,或怯懦比較傳神,不是身體上的弱,是性格上,精神上的弱。
令我想起,幾年前尹思哲寫的書──《創業起義》,其中最後一章是訪問黎智英。在最後一節中,黎智英強調:創業成功,不是看聰不聰明,而是有冇勇氣,wimp永遠不會贏。對,兩者也是用同一個字。
當黎智英和PG不約而同地,都用同一隻字來為關於創業的訪問做結尾,都認為是創業成功最重要的特質,我估,錯極都有個譜。

勇氣與一般蠻勁不同

甚麼是勇氣?勇氣和蠻勁不同,走去笨豬跳,需要的是蠻勁多過勇氣,跳落海創業,大概都靠蠻勁多過勇氣,但有蠻勁創業,不代表有勇氣成功,短線靠蠻勁,長線靠勇氣。創業得夠長時間,總有林林總總意想不到從未遇過的困難不停在你面前出現,有人退縮逃避,蠻勁帶到這裏行人止步。有人敢於面對嘗試克服,那就是勇氣。逃是蠻勁,捱是勇氣。
Wimp最明顯的徵狀,是賴地硬,凡事賴外圍因素,例如startup搞不好,是政府不夠支持,或者最衰是冇個科技局,這是民粹政客思維。政府有冇任何事情可以做來幫你更成功?可能有。政府值得做嗎?未必。但肯定的是,如果認定你最需要的是政府幫手,你公司不會成功。
黎智英和PG,都說勇氣重要。勇氣重要的原因,兩人的看法也很相似。有趣的問題,是勇氣有得後天補足嗎?
PG說,以他投資過百家團隊的經驗,好多人其實有勇氣而不自知,經過試煉,先發掘到出來,當然有人點掘都不會有,但我感覺是他對發掘勇氣,比較樂觀。黎智英則斬釘截鐵:冇得救,wimp是天生的,你天生是就是。
兩者併埋,可以說成:知識可以後補,但勇氣是天生的,有人多、有人少,但就算有,都要經過試煉,先可以發掘出來。有足夠勇氣在創業路上克服一個又一個無盡困難,就是創業成功最重要的特質。
困難是相對你現在的能力。要克服困難,即是要應付超越你現在能力所及的事,一個前提,是你能夠進步,為解決眼前困難而提昇自己的能力。

橫向進步比縱向難得

這幾年來,見過不少人,進步力的差異,大過我想像。進步有兩類,一類,是縱向的進步,同一類事情,由淺入深,一步步晉級。另一類,橫向的進步,是要在不同類型的事情上,水來土掩。我的觀察,是不同的人的橫向進步力差距,比縱向的大得多。創業可能是其中一種最講求橫向進步力的活動,如果觀察屬實,創業的成績差異大,就一點都不出奇。
點解橫向進步力比較難得?我估,是因為橫向進步,需要的勇氣,比縱向多。同一件事,例如專業的職業,由二升到三,由三升到四,已經有個底,繼續前行,未必需要好多勇氣。但如果是面對不同類型的事情,仲要之前連個類型都未見過的,要不斷前行,需要的勇氣多好多。
聽落好似好灰,我自己有兩種想法,去令自己捱的過程好過一點。第一,越困難的事情,克服了,越大滿足感。有個朋友,每年去一次歷險,甚麼環島單車,一支公踩上西藏呀等等,問他點解自找困難,他說因為越難,之後的滿足感越大。第二種想法,是越難的東西,克服了,就越少人能夠趕上,所以遇到困難,尤其是你估對手都會遇到的,應該感恩,如果冇困難,又點會得你一個行到這裏?
讀幾多書,同勇氣有冇關係?自己觀察,關係不大。讀書好,靠聰明勤奮,不太靠勇氣,也不會發掘勇氣。創業如果單靠聰明勤奮,風投基金押注,只看成績表就夠了。如果一個人,頭二十年基本上專注讀書,冇其他比較大的試煉,自己都好難知道有幾多勇氣。
就好似一些電影類型片公式裏頭,主人翁由渾渾噩噩,到無端端開始歷險,一關難過又過一關,最後在心深處發掘出自己的最大勇氣,任務完成,賺到的不只是公主寶劍友誼,還有對自己勇氣的肯定。

宋漢生 

Friday, November 1, 2013

Get a decent 'Nitrous' viewport output with diffuse / normal mapped meshes in 3DS MAX

1. Use BITMAP for material's "Bump" mapping slot instead of "Normal Bump" map type.

2. Use higher resolution (e.g. 2048*2048) PNG bitmap type for baking normal & diffuse light maps.
3. For default scanline render driver, it goes to 3DS mode by default. While for my ATI card only supports 'Nitrous' driver, I get a 'tip' (so generous for Autodesk!!) from official site, I need to use 'Realistic' instead of 'Shaded' mode for viewport rendering to get a decent baked mesh render output.


4. for Normal Map, set 'Blur' to lower value e.g. 0.3 ~ 0.6 and 'Blur offset' to higher, let's say 1.0


Monday, May 27, 2013

Photoshop /3ds Max hot keys & game asset creation practice

0. Ctrl + Right Mouse Click-> create mesh primitives.
1. F12 - translation short cut
2. Freeze a bounding box - create a bounding box for modeling the real mesh which wouldn't be modeled with unexpected portion or form when you extrude some vertices or scale up/down the mesh accidentally.

See through the object.
3. Unfreeze object -> select object -> right click ->object properties -> Display a box
4. Freeze again

Check SNAP Quad setting
5. Shift + Right click -> check
   -> no Grid point
   -> check Vertice
   -> check Snap to Frozen Objects
   -> check "Enable Axis Constraints in Snaps"

6. Snap 2.5D, snap on Z-axis when you are doing in X&Y axes.
??That way, I don't accidentally snap something up onto Z-axis when I only want on X&Y.

7.a A - angle snap for rotation.
7.b S, moving edge/vertex snap to a grid, [Tools->Grid and Snap settings-> option->enable axis constraint]
8. Space bar - selection lock, any modification will lock onto selected object.
9. G - turn on/off the grid

10. UVW unwrapping
      if you find that the connected side for the UVW unwrapped texture is not what you want, just simply flip the object/mesh by rotating the orientation. For example, if you found the top face is not the connected polygon to the sides' faces and it's at the far remote on the unwrapped UVW, just rotate the mesh up side down, it will do you a favor after unwrapping.

11. Alt + x, see through Mode
12. Ctrl+Shift+Z, fit all meshes to screen.
13. Ctrl+Shift+S, Nitrous Texture Tweak
14. set desired current screen, F -> T -> F, set current view as Front view.
15. Ctrl + c, connect segment, after select parallel/multiple segments.
16. Alt + Q, hide un-selected.
17. selected a edge, Alt+L, select the whole loop from that edge.
18. [Ctrl + Shift] Left Click, if you select a vertex/face in a loop, this can select all vertices/faces on a loop.
19. Ctrl + W, Target weld
20. Shift + W, weld
21. Alt + W, Toggle quad view Or specific view with fullscreen
**** 22. Double click on an Edge, select a loop of the edge in a row. !!!important!!!
23a. Select Edge/Vertice, Ctrl + I, invert selection on same mesh
23b. Select Edge/Vertice, Alt + I, hide unselected.
24a. Select Edge / Edge Loop Ring, Shift + E (i.e. extrude perpendicularly) Or
24b. Select Polygon, Right click -> Insect. (i.e. adding scale-down face inward along the same polygon)
25. In UVW unwrap editor,
    a. S - Stitch
    b. D - detach
Note: In 3ds max, select multiple faces, scale on normal axis Or set "Make planar" are the same way to flatten all of the planes.
** move the pivot to center of mesh for alignment to other mesh
*** Ctrl-Shift-x
**** Editable mesh->select face/polygon -> Mouse Right Click-> Select "Inset" properties 
(Note: sometimes we don't want to create edge loop by "shift-f" as it's cannot create the loop around the whole edge of mesh in a time, we need to use "Inset" over on the polygon instread.)

**** Face to Grow: select 1 Face -> click "grow" from the right down menu.

Photoshop Tips for UVW texturing
1. Ctrl + i - invert color (e.g. black background+green lines => white background+pink lines)
2. Ctrl + Shift + u (i.e. saturate to turn to grey lines)
3. Ctrl + L (adjust grey level, usually used in blueprint to highlight those outlines)
3a. Ctrl + +Shift + L (auto-level, bring out the contrast of entire image)
4. double click the background layer name to template -> blending mode to "Multiply" -> lock that layer
5. Z - zoom in/out
6. Ctrl + d - deselect
7. Ctrl (move) + alt (drag & duplicate) / + shift (to lock moving direction)
8. Ctrl + left click on "layer thumbnail" - to select that layer element alone.
9. g - gradient / paint bucket
10.x - toggle color.
11. Ctrl + right click to select layer
12. Ctrl + t - transform (+shift to snap the angle for rotation) + ENTER to finish transform
13. Ctrl + e - flatten / combine / merge layers
14. TAB - maximize working window
15. Space + left click - pan over the layer
16. Ctrl + R - rulers
17. i - ink sample
18. w - magic wand tool
19. m - marquee tool
20. m + select + ARROW keys - nudge or move slightly
21. v - move
22. ctrl + shift + n - new layer
23. e - erase
24. ctrl + -/+ - zoom out/in
25. ctrl + 0 - fit to screen
26. ctrl + g - group
27. t - text input
28. [ or ] - decrease/increase size, for example brush size
29. f - toggle full screen
30. TAB - toggle full screen & toolbars
31. F7 - (in full screen mode)layer menu toggle
32. Ctrl + u - hue/saturation (in any layer)
33. In-Between layers, Alt + Left Mouse Button, making layer Stencil / back layer see thru' upper layer's pattern.
34. Ctrl + J, duplicate layer instantly
35. Ctrl + Shift + u, remove color / desaturate
36. Ctrl + i, color inversion
37. Ctrl + u, hue/saturation/brightness control
38. Ctrl + g, group layers in the layer menu
39. Edit->Define Pattern => Shift + F5 (fill pattern)
40. Ctrl + d, deselection, anything
41. Ctrl + Alt + i, change image size
42. Ctrl + 0, zoom full screen
43. Ctrl + ', turn on Grid = View->Show->Grid

Friday, April 12, 2013

Cautions for importing Blender FBX to Unity3D

I'm using Blender 2.64 for modeling but exporting them to Unity3D 4.x for makgin game.
There are few discrepancies for them.

1. By Default, the scale for FBX imported model is 0.01, weird!
So, you need to create a folder under "Assets\Editor" and place the following script.


  1. using UnityEngine;
  2. using UnityEditor;
  3.  
  4. class MeshPostprocessor : AssetPostprocessor {
  5.  
  6. void OnPreprocessModel () {
  7. (assetImporter as ModelImporter).globalScale = 1; /* whateverNumber */
  8. }
  9.  
  10. }

2. As exporting the model to FBX format, check the "Forward option" as "Z forward", as the setting is "-Z forward" in Blender while in Unity3D is "Z forward".

3. By default, meshes in Blender is 2x2 sized comparing to those in Unity3D, you need to scale down them by 0.5 for all dimemsions (i.e. x:y:z).

4. And texture images files cannot be FBX-exported to Unity3D automatically, you need to use a software called "FBX converter 2013" embedded those image textures into the FBX files before "asset-import" to Unity3D.


Thursday, March 21, 2013

Sincere advice for an Indie game developer

This may be a good recommendation for a game start-up, especially for Indie, even, for ME!


Essential Indie Lessons
Thought: If you think about starting a project as a hobby and don’t want it to last a few years, or if you don’t have somebody to coordinate a bigger team, think twice about adding a 3rd dimension to your game and rather think about a great 2D game concept that can be realized with a small number of people (i.e. typically a programmer and an artist). Of course this insight isn’t true for all projects. If you found a great way of focusing and reducing gameplay, visual style or environment complexity, you might be OK with a small team. Take Rat King Entertainment for example. They’re a team of 2 and make the awesome Tri 2, a 3D platform puzzle game I’m looking forward to seeing released. So a 3D game might work if you have a unique approach to your game and stay focused on your very own niche and limited scope.

http://www.design3.com/component/k2/item/2547-essential-indie-lessons